.
Newcomb High School (9th-12th grade) and Middle School (6th-8th grade) student art work and creativity on display.

Pages

Wednesday, May 18, 2016

Burlap Checker Boards with String Bags

High School - Craft

For the last craft project of the year, I knew I wanted to make a game of some sort - something that was fairly low maintenance and that could be played in class for the last few days.

Answer: Burlap checker games!


The board is a piece of burlap marked with black sharpie. Rulers are recommended for this part!

We made a small string bag to store the game and pieces. Students could either do a square bag or long bag as they preferred.


The pieces are smooth rocks gathered outside and painted in two colors of choice, one for each side off course.


Tuesday, April 12, 2016

Vincent Van Gogh's Bedroom

High School - Art 1 - Analogous Colors

This is the end point all those value scales were building up to... a reproduction of Vincent Van Gogh's Bedroom at Arles.
The catch is that students could only use the 2 Primary colors picked for their Analogous Chart, along with black and white. Any color variations derived from mixing these initial colors were allowed.

Students were provided with a colored print of the original painting (image on right) and a couple "coloring pages" of the same (below).

After drawing the bedroom on a big 9x18 in. paper, and referring to their Analogous Chart, they did one or two practice run of color scheme with color pencils on the coloring page, to have a better idea of how they wanted this to look.

It took 2 weeks to get to this point and another 3 to complete the painting. This was a really good unit, with a nice progression of difficulty and paint mastery. From the look of the final product, I'd say this was time well spent.


Friday, April 1, 2016

Paper Mache Piggy Banks

High School - Craft

These piggy banks are fun and cute and just plain awesome!

Students took great care in the painting phase, with drawing the design beforehand and then going slowly with detailed painting.

This was the first time I've used flour for the paste, and I can tell you it is a lot easier to deal with, to clean, and to handle than the "paper mache glue" sold in craft stores.

Get regular wheat flour (higher the gluten content the better) and mix with water with a pinch of salt.
Ratio is approximately 1:1.5 flour to water. The salt prevents mold. We mixed the paste in plastic containers with lids. The next day we just had to mix it around a little and it was good to go. It does give a distinct yeast smell to the room! :)


This was a highly successful project that I look forward to doing again next year.


Tuesday, March 15, 2016

Analogous Value Charts

High School - Elements of Art: VALUE & COLOR

This is our third and last value scale - more of a chart, really - and the last step before getting into our main color project (see Monochromatic for the first).

These chart have two purposes:
1. the continuation of our learning to mix colors for a specific desired result;
2. acting a visual reference point for the up-coming painting.

Analogous means colors that follow each other on the color wheel, typically 3 colors, though in this case we created more than three.

Students choose 2 of the 3 primary colors (red, blue, yellow) in addition to black and white paint. I picked two charts for each color pairs to display here, as they are a bit repetitive otherwise.

Thursday, March 3, 2016

Monochromatic Value Scale

High School - Art 1 - Elements of Art: COLOR & VALUE

Time to dive into colors! To start on this unit, we first talked about Value and its definition as related to art, referring to the range of lightness and darkness of a color.

For warm-up, students did a gray scale with paint showing 5 different values of gray by mixing black and white paint in the proper proportions.


The 2nd Value scale was a Monochromatic Scale, using only 1 color with black and white.

Wednesday, March 2, 2016

Painted Color Wheels

Middle School - Elements of Art: COLOR

After all that practice mixing colors with the Value Scales and Robots, students were ready to create their own color wheel.

We learned about all the colors, their places on the wheel, names of various categories of colors, and practice coloring one with color pencil. Whew! Finally, we were ready to tackle the real color wheel.

Students had to decide on a theme and come up with a variety of drawings to create the wheel. Once drawn, each color had to be assigned to its proper placement.


Thursday, February 25, 2016

Chinese New Year Composition

High School - Art 1

For the high school Chinese New Year composition, I provided the students with several pages of Chinese characters, designs, cartoons and other Asian style illustrations.

From these they were to pick and choose and put multiple elements together to create their composition, altering any designs as they please to make it their own.


The final product had to be colored with color pencils.

Wednesday, February 10, 2016

1 Point Perspective Room

High School - Art 1 - Perspective

After several days of learning and practicing 1 point perspective as a class, the students were ready to be set out on their own. They had to create their own room using the 1 point perspective technique.

The minimum requirements for the assignment were as follows:
  • 1 window
  • 1 door
  • 1 doorway into another area
  • 2 pieces of furniture

Dragon Puppets For Chinese New Year

Middle School - Craft

The Chinese New Year for 2016 fell on Feb. 8th. It's the year of the Monkey.

We discussed similarities and differences between the traditional Chinese calendar and the western calendar. Each kid got to find out what animal they were born under. I also read the characteristics for each of the animals represented in the room, creating a few laughter among the group.

Wednesday, January 27, 2016

Value Robots

Middle School - Elements of Art: Value

For this unit we talked a lot about value, meaning going from light to dark or dark to light.
Kids practiced this concept first with pencil, then with 1 color plus black and white, to create the value scale you see below.

The first row is black and white paint mixed to create the various values of grays.
The second row is the color, blue in this case, mixed with white, and the third is blue mixed with black.


Once all those steps were complete, the kids were ready to draw their robots!


Thursday, January 21, 2016

Sock Monkeys

High School - Craft

The kids did an absolute incredible job with these monkeys.

Looking for project ideas, I happened on one on the web and immediately knew we had to do this. Off I go to get socks, thread, and stuffing and we're in business.

Though it does look fairly simple, it took a lot longer than anticipated. The kids were all good sport about it and kept at it at a steady pace. The results are nothing short of cute and I'm very proud of what they accomplished. Some of the kids had never handled a needle before.

I've since seen a multiple of sock animals, so next year I might add more choices depending on what templates I can find - and as long as it only take a pair of sock for each.

Friday, January 8, 2016

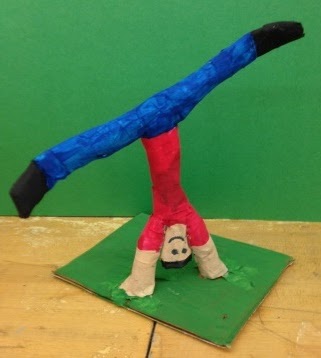
Dynamic Masking Tape Sculpture

Middle School - Sculpture

As our last project before the Christmas holiday, I thought it'd be cool to do a 3-D project of some kind. We are finishing up on our Shape & Form Unit, so what better way to explore form than through sculpture?

The key terms for this project are STATIC and DYNAMIC.

I give you: A Dynamic Sculpture!
Some may be more dynamic than others, and they're ALL nonetheless amazing.

This was so much fun to do, and ho what a mess! And so worth it!!! I'm sure you'll agree as you go through the result below.


Wednesday, December 9, 2015

Snowman And Reindeer Pompoms

Middle School - Craft

For the Christmas season, kids that were done with their Snowflake (link soon) and other assignments had the option of making a pompom snowman, reindeer and/or Santa.

We got a whole herd of reindeer and several snowmen but only one Santa. A few sheep where thrown in there too for good measure. There were pieces of yarn everywhere!

The kids were overjoyed with their creations, myself as well, as they are the cutest things. Notice "cool Santa" has sun glasses on and so does his reindeer.


Tuesday, December 8, 2015

Vase Faces Reversible Images

High School - Art1 - Elements of Art: Positive/Negative Space

We were studying a concept called "Reversible Figure-Ground Relationship," which is a fancy way of saying Visual Illusion. The idea is that it is hard to tell which part of the image is the "figure" - or "positive" shape/space, i.e. actual object drawn - and which part is the "ground" - or "negative" shape/space, i.e. background.

You've seen these images that flip back and forth when you change your eye focusing while looking at them, like this one for example:

Which do you see? The young woman or the old lady?

Friday, December 4, 2015

Paper Flowers With Table Centerpiece

High School - Craft


This wonderful craft is very easy to do and is even more amazing looking than I had anticipated. The kids did a wonderful job with their flowers. They look as close to real as you can get with paper.

Glass bottles are wrapped with yarn of several colors according to taste, with glue being spread on the bottle every so often to prevent the yarn from unwrapping. Pretty easy.

As for the flowers, well, a quick search online will result in plenty of instructions.

Meanwhile, enjoy the pictures:

Tuesday, November 3, 2015

Halloween Monster Faces

Middle School -

This is the first Halloween project we've done this year: Monster Faces!

Kids start with folding a piece of card stock in half and cutting out a mouth - this can be in any style desired, with or without teeth. By unfolding the card stock and pushing the mouth part forward, kids then draw a face around it to create their monster(s).

Any Halloween / horror character was allowed.


Sunday, November 1, 2015

American Gothic Halloween Parody

High School - Art I

For the Halloween season, I had the kids do a parody of American Gothic, Halloweens style.

This is the one time during the year where they are allowed to be as gory or disgusting or bloody as they want - surprisingly, most kids chose to be relatively tame, which is actually nice.
They could also pick a different theme if Halloween was not their thing.

We had pictures of the painting American Gothic by Grant Wood, as well as various examples of parodies I found on the net for inspiration.

Friday, October 2, 2015

Warm Cool Protractors

Middle School


The idea with this coloring project was to practice control of a color pencil, with shapes being colored in from light to dark and dark to light. We were also talking about warm and cool colors so that element was added to the project.


We simply traced multiple protractors onto the paper, keeping overlapping lines visible. In addition to going from light to dark in each shape, kids also had to change from warm to cool colors whenever they went over a line. Once done, we filled in the background with black tempera paint to make the protractors stand out more.

Surprisingly, most kids turned out to have a real hard time with this one. That tells me we need to practice proper coloring techniques more...


Friday, September 25, 2015

Alien Name Bugs

Middle School - Color Pencil

We've been talking about lines a lot lately, so I was looking for something for the kids to do with a colorful line background when I happened on an idea from another blogger - to have kids write their name in cursive and turn it into a bug.

We took that idea and went a couple steps further. First each writes his or her name in cursive on a folded piece of colored construction paper. Then they double up the lines to make the letters "bubble style".

Once the name is carefully cut out, taking care to preserve enough of the fold, the name is glued down, unfolded, onto the line background. Finally, the last step is to add whatever necessary to turn that name into an "Alien Name Bug".

Kids made a game to try and figure out who was who once all the projects were up on the board.

Wednesday, September 23, 2015

Plastic Grocery Bag Notebook Covers

High School - Craft

I try to use recycling material as much as I can for craft projects, and this time I found the perfect item: plastic grocery bags!

We cut and folded white paper for the inside, then sowed them together with needles and strings.

The covers were made following the instructions found on this Instructable post, which shows how to cut and layer the grocery bags, sandwich these between 2 layers of wax paper (wax facing in), and finally iron over the whole things to melt the bags and wax into a single sheet of plastic.